Most of the heat entering a home comes through the roof. RadiantGUARD® radiant barrier foil insulation installed in an attics can reduce attic temperatures by up to 30 degrees when stapled with a staple gun to the underside of roof rafters by REFLECTING up to 97% of the radiant heat that strikes its surface thereby reducing heat transfer from the attic to living spaces resulting in lower utility bills. This method also reduces the heat subject to attic mounted AC duct work thereby allowing them to work more efficiently.
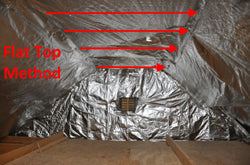
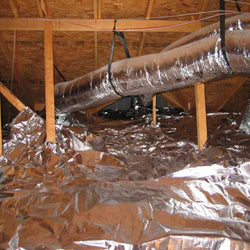
A secondary method of installation, instead of installing under the attic rafters, is to lay the foil insulation over the attic floor. Although this method of laying over the attic floor won't lower the temperature of your attic space, it will still REFLECT up to 97% of the radiant heat that strikes its surface thereby reducing heat transfer from the attic to living spaces resulting in lower utility bills. To compensate for the exposed AC duct work with this installation method, you can easily lay a blanket of radiant barrier over the duct work to protect them from the heat.
The following tips are provided to help reduce the labor time involved when installing radiant barrier and make your radiant barrier installation project and easy one.
Radiant barriers can be extremely effective at lowering radiant heat transfers when used in exterior siding applications but again, it MUST have an air space on at least one side of the radiant barrier for it to work. In this application, a radiant barrier is installed like a typical house wrap yet before the siding is installed, you must attach 1 X 2 furring strips over the top of the radiant barrier to which to attach the siding. This creates the required air space for the radiant barrier to be effective.
Installing Behind Brick or Siding as a House Wrap
Suggested Product: RadiantGUARD® Xtreme radiant barrier breathable (this version is perforated to allow moisture from home to easily pass through and out of your home).
|
 |
|
Installation Summary:
-
Starting at one end of your attic, install our Xtreme breathable radiant barrier across attic floor joists, plywood decking or existing insulation. Use a stick (1/4" furring strip with nail in the end works well) to help push the barrier into the tight spaces of your attic.
-
Continue covering the attic floor by overlapping each section of radiant barrier already rolled out by 2" inches.
-
When laying the foil insulation, it is not necessary to make it lie smooth or flat. It is also not necessary to tape the seams. You can staple the barrier in place if you wish but it's not necessary.
-
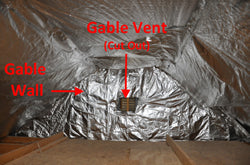
Staple the radiant barrier to all knew walls located in your attic space overlapping each piece by 2".
-
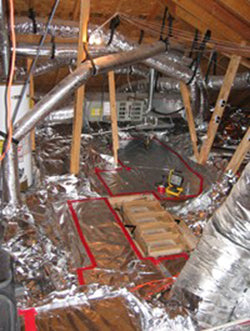
Cut out any material around appliances that produce heat and/or protrude through the attic floor (canister lights) and mark any electrical junction boxes that are covered by the radiant barrier.
Click to view detailed instructions:

|


|
| |
Roofing Applications
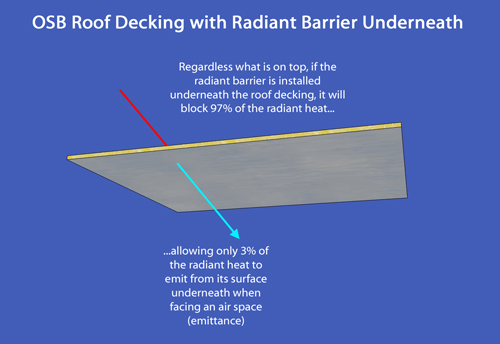
A radiant barrier can be very effective at BLOCKING radiant heat when installed in conjunction with roofing and siding material, however, the radiant barrier MUST be installed with an air space on at least one side of it. As long as there is at least a 3/4" air space on either side of the radiant barrier, the application will be effective at BLOCKING radiant heat. For more information on why a radiant barrier must have an air space on one side of it to be effective, please see our What is Radiant Barrier page.
Roofing systems that utilize purlins or batten/counter battens are ideal for the addition of a radiant barrier because the roofing easily provides for the required air space already. Metal, tile, and slate roofing systems are examples of such roofing systems where a radiant barrier can be easily incorporated.
Equally as important as the air space on a radiant barrier is the requirement that a radiant barrier remain clean and dry in any application.
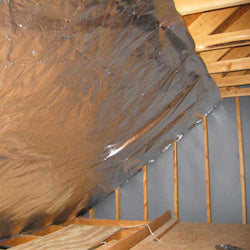
The picture below shows a batten/counter batten system with a slate/tile material with a radiant barrier on top of the counter battens. The radiant barrier is installed on the top of the counter battens in non-watertight applications. This allows the radiant barrier to remain dry while also achieving the 3/4" air space requirement.

If the roofing material is watertight, installing the radiant barrier on top of the felt with the batten on top of it would be sufficient.
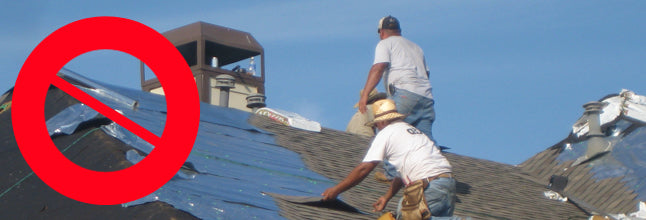
Don't Do This...
Because a radiant barrier needs an air space on at least one side, installing it directly below felt and shingles will NOT allow the radiant barrier to block any radiant heat. Instead, the heat from the shingles and felt will conduct all the way through the barrier, into the attic, and eventually in the living spaces.
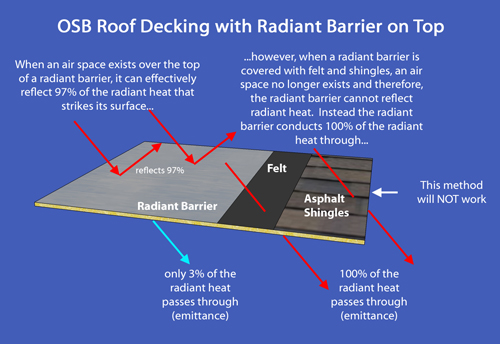
Instead Do This...
If an asphalt shingle roof is being installed, you should install the radiant barrier to the underside of the roof decking or roof rafters in the attic space below.
Additional Installation Tips & Tricks
General Tips
-
When installing on the attic floor, work from the outer most regions of the attic and work your way towards the middle (ideally where the "roll caddy" is located).
-
Cut the longest pieces of barrier as fits when laying out in long run sections of your attic. It will cut down time spend on cutting and positioning smaller pieces. To determine the length of a piece of radiant barrier needed, count the number of floor joists or rafters that span the area you are working in and multiply this number by 2 if your rafter/joist span is 24". The resulting number is the linear feet of barrier you should cut to fit this space.
-
For Do-It-Yourselfers (DIY),
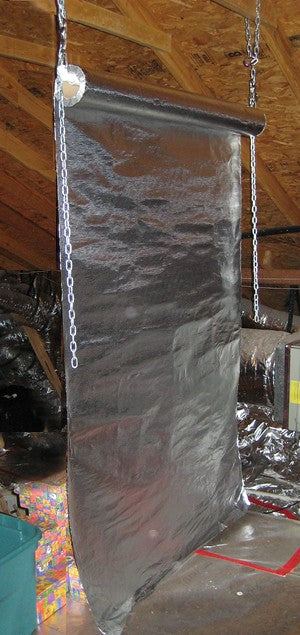
Roll Caddy Creation & Setup
This roll caddy design is an inexpensive option to help with measurement and cutting of the radiant barrier. It helps to lift and hold the roll of radiant barrier up at a workable height making it easier to measure and cut.
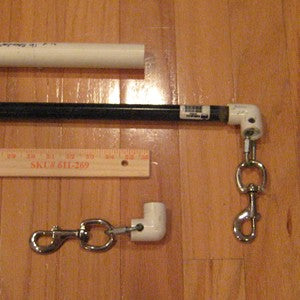
Parts Needed:
- 1 four foot piece of 1/2" black threaded plumbing pipe
- 1 four foot piece of 1" PVC pipe
- 2 threaded elbow PVC joints
- 2 quick links
- 2 snap hooks
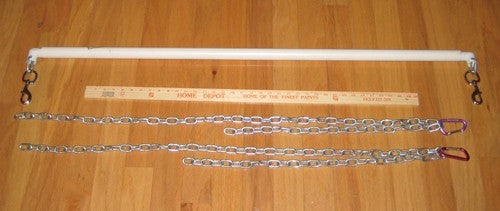
- 2 three foot pieces of chain (see lower picture)
- 2 safety hooks (see lower picture)
#ad: As an Amazon Associate we earn a commission from your qualifying purchases.
Instructions to Create:
-
Drill a hole in one end of each elbow large enough to fit the quick link through.
-
Attach the snap hooks to each quick link.
-
Screw one elbow onto one end of the black threaded plumbing pipe.
-
Slide the PVC pipe onto the black threaded plumbing pipe (start at end without the elbow attached).
-
Screw the remaining elbow onto the other end of the black threaded plumbing pipe.
Completed Roll Caddy
Setting Up the Roll Caddy
Locate an area over some floor decking that will allow you secure the chains (either draping over rafters or nailing to studs) to elevate the roll caddy 4 to 6 feet in the air. Secure one side of the roll caddy to one of the chains with one of the safety hooks.
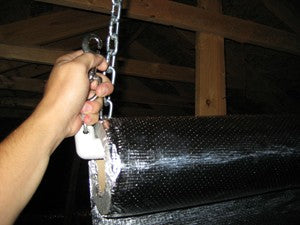
Slide the roll of radiant barrier onto the roll caddy and secure the remaining side to the chain with the remaining safety hook.
By knowing the height of the roll caddy, you can quickly determine the point at which to cut based on the length you need by taking the end of the barrier down to the attic floor and back up as necessary. For example, if your roll caddy is 5 feet off the attic floor and you need a 15 foot long piece cut, you can quickly determine 15 feet by unrolling three caddy-to-floor sections and then cutting.